Halloween arrives once a year, and your nails deserve to celebrate just as much as your costume does. From haunting black cats to glittering pumpkins, nail art offers endless opportunities to express your spooky spirit without committing to a full costume. These designs range from subtle and chic to bold and theatrical, ensuring every nail enthusiast finds inspiration. Whether you prefer minimalist elegance or eye catching artistry, the possibilities this season are truly remarkable.
The beauty of Halloween nail designs lies in their versatility and creativity. You can wear these looks to parties, at work, or simply for your own enjoyment throughout the month. Keep scrolling to discover 15 stunning designs that will transform your fingertips into miniature works of seasonal art.
Halloween Nail Designs
1. Spooky Black Cat Nails
Black cats are synonymous with Halloween, and translating this classic symbol onto your nails creates an instantly recognizable design. Start with a smooth jet black base as your foundation, then use a thin nail art brush to paint adorable cat silhouettes on accent nails. The cats can be sitting upright, arched, or in profile, depending on your artistic comfort level.
Add golden or white eyes using a dotting tool for dimension and visual interest. The contrast between the dark base and bright eyes makes each cat pop beautifully. This design works wonderfully on both short and long nails, though longer shapes like almond or coffin nails provide more canvas space for detailed features.
- Nail shape: Almond, square, or coffin
- Base color: Jet black or deep charcoal
- Accent details: Cat silhouettes with golden or white eyes
- Finish: Glossy or matte topcoat
- Optional add ons: Tiny orange pumpkins between cats, or gold leaf accents
Black cat nails suit any Halloween occasion and transition seamlessly into everyday wear. The design remains timeless throughout October and pairs perfectly with both casual and formal outfits. Maintenance is minimal, though touching up the cat faces occasionally keeps them sharp and defined.
2. Blood Drip Ombre Nails
This dramatic design combines ombre gradients with theatrical blood drips for maximum impact. Begin with a deep crimson or burgundy base that fades into black toward the tips. Use a sponge to blend the colors seamlessly, creating a gradient effect that feels intentional and polished.
Once the base is complete, paint realistic blood drips starting from the cuticle area using a thin brush and bright red polish. The drips should vary in length and thickness for authenticity. Seal everything with a glossy topcoat to enhance the wet, dramatic appearance.
- Nail shape: Stiletto or coffin for maximum drama
- Base color: Deep crimson fading to black
- Accent details: Bright red blood drips of varying lengths
- Finish: High gloss topcoat
- Optional add ons: Black studs or rhinestones embedded in the drips
Blood drip nails make a bold statement at Halloween parties and costume events. This design demands confidence and suits those who embrace dramatic aesthetics. The look requires careful application, so consider visiting a professional nail technician for flawless execution.
3. Ghostly White Minimalist Nails
Sometimes subtlety speaks louder than bold graphics, and ghostly white nails prove this concept beautifully. Apply a creamy white or pale ivory base to all nails for a clean, polished foundation. On one or two accent nails, use a thin black brush to paint simple ghost faces with round bodies and small dot eyes.
The minimalist approach keeps this design sophisticated and wearable for professional settings. Each ghost can be unique in expression, from cheerful to mischievous. A matte topcoat enhances the ghostly aesthetic, though glossy works equally well for a more refined appearance.
- Nail shape: Round, square, or short almond
- Base color: Crisp white or pale ivory
- Accent details: Simple black ghost faces on select nails
- Finish: Matte or glossy topcoat
- Optional add ons: Tiny black dots for texture, or soft gray shadows beneath ghosts
Ghostly white nails transition beautifully between Halloween season and everyday wear. The design suits office environments, casual outings, and seasonal celebrations equally well. Maintenance remains straightforward, with occasional touch ups to keep the ghost faces crisp and clean.
4. Glittering Pumpkin Orange Nails
Pumpkin orange is the quintessential Halloween color, and combining it with glitter creates festive nails that capture autumn’s spirit. Paint all nails with a warm, vibrant pumpkin orange base using two coats for full opacity. Once dry, apply a generous layer of gold or copper glitter over the entire nail surface for maximum shine.
For added dimension, paint tiny pumpkin outlines on one or two accent nails using a darker orange or black. The glitter background makes these outlines appear to float and shimmer. Seal with a thick glitter topcoat to ensure the sparkle lasts throughout your Halloween festivities.
- Nail shape: Square or rounded for even glitter distribution
- Base color: Warm, vibrant pumpkin orange
- Accent details: Gold or copper glitter overlay with optional pumpkin outlines
- Finish: Thick, sparkly topcoat
- Optional add ons: Black cat silhouettes, spider web designs in black
Glittering pumpkin nails work beautifully at parties, trick or treating events, and festive gatherings. The cheerful color suits all skin tones and complements autumn wardrobes perfectly. Glitter removal requires patience and a good quality remover or acetone to prevent nail damage.
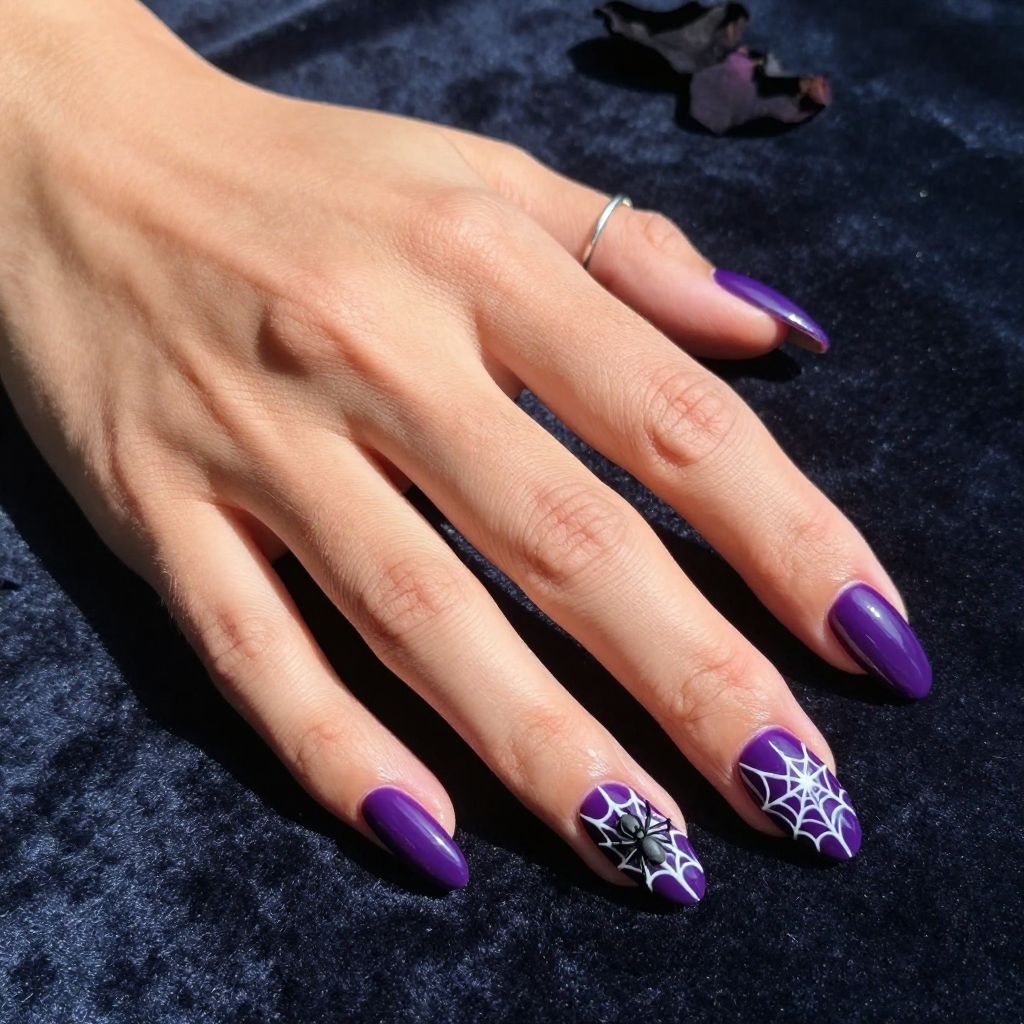
5. Haunted Spider Web Nails
Spider webs are iconic Halloween symbols that translate elegantly onto nails of any length. Start with a dark purple, navy, or black base as your canvas. Using a thin brush and white, gray, or metallic polish, paint intricate spider web patterns that stretch across each nail.
For added realism, place a tiny black spider somewhere on the web using a dotting tool or thin brush. The contrast between the dark background and bright web creates striking visual depth. Glossy topcoat amplifies the three dimensional effect of the webbing.
- Nail shape: Coffin, almond, or stiletto
- Base color: Deep purple, navy, or black
- Accent details: White or metallic spider webs with tiny black spiders
- Finish: Glossy topcoat for depth
- Optional add ons: Orange or red accents, rhinestone details on spider bodies
Haunted spider web nails suit Halloween parties and costume events perfectly. The intricate design requires patience and a steady hand, making professional application a worthwhile investment. This look remains fresh throughout October and works for both casual and formal occasions.
6. Vampire Bite Gradient Nails
Vampire aesthetics bring elegance and drama to Halloween nail art. Create a pale ivory or nude base that represents porcelain like vampire skin. Blend this base into deep burgundy or plum tones at the tips using a sponge gradient technique for a sophisticated ombre effect.
On accent nails, paint tiny fang marks or bite wounds using bright red polish and delicate detailing. Small drips of red extending from the “bite” enhance the theatrical effect. This design beautifully balances elegance with spookiness, perfect for those who prefer sophisticated Halloween aesthetics.
- Nail shape: Almond or stiletto for vampire aesthetic
- Base color: Pale ivory fading to burgundy or plum
- Accent details: Red fang marks or bite wounds on select nails
- Finish: Glossy topcoat
- Optional add ons: Black glitter, rose gold accents, or tiny diamonds
Vampire bite nails suit evening events, costume parties, and anyone embracing gothic or dark romantic aesthetics. The gradient technique requires some practice, so professionals can ensure flawless blending. This design transitions well into late autumn and works beautifully with dark, moody outfits.
7. Candy Corn Striped Nails
Candy corn represents classic Halloween nostalgia, and its distinctive three color pattern translates beautifully onto nails. Paint each nail with three horizontal stripes: bright yellow at the base, orange in the middle, and white at the tip. Ensure clean lines between colors by using painter’s tape as a guide during application.
The cheerful, recognizable design brings instant Halloween vibes to your fingertips. Each nail becomes a tiny piece of candy corn, creating a cohesive, playful look. A matte finish enhances the candy appearance, though glossy topcoat adds modern sophistication.
- Nail shape: Short to medium square or round
- Base color: Bright yellow stripe at base
- Accent details: Orange middle stripe and white tip stripe
- Finish: Matte or glossy topcoat
- Optional add ons: Gold glitter between stripes, tiny dots for texture
Candy corn nails suit children, families, and anyone embracing playful Halloween traditions. The design remains cheerful and accessible for home application with painter’s tape guidance. Maintenance is minimal, though keeping the stripe lines sharp requires careful handling and occasional touch ups.
8. Skeleton Skull Nails
Skulls are quintessential Halloween imagery that demands respect in nail art execution. Apply a creamy off white or bone colored base to all nails as your foundation. Using a thin brush and black polish, paint detailed skull faces with empty eye sockets, a nose cavity, and a grinning teeth line across the lower nail.
Add intricate details like cracks, bone textures, or subtle shading to make each skull unique and realistic. Small jaw bones or crossbones beneath skulls enhance the traditional pirate aesthetic. Black topcoat completion ensures colors remain vibrant throughout wear.
- Nail shape: Almond, square, or coffin
- Base color: Off white, cream, or bone
- Accent details: Black skull faces with empty sockets and grinning teeth
- Finish: Glossy topcoat
- Optional add ons: Gold accents, crossbones, or floral elements around skulls
Skeleton skull nails suit Halloween parties, costume events, and edgy personal style preferences. The design works beautifully on longer nail shapes that provide more detailing space. Professional application ensures anatomically accurate skulls, though confident DIY artists can achieve impressive results with practice.
9. Witch Hat Themed Nails
Witch hats symbolize magic and mystery, translating into charming nail art designs. Start with a deep purple or black base representing magical darkness. On accent nails, paint iconic witch hat silhouettes using contrasting black or dark purple polish with a thin art brush.
Add a tiny moon, stars, or sparkles around the hats for enchanted appeal. The design works equally well on all nail shapes and lengths. A glossy finish gives polish and dimension, while matte creates a more mysterious appearance.
- Nail shape: Any shape works beautifully
- Base color: Deep purple, black, or midnight blue
- Accent details: Witch hat silhouettes with moons, stars, or sparkles
- Finish: Glossy or matte topcoat
- Optional add ons: Gold glitter, tiny rhinestones, or potion bottle designs
Witch hat nails suit those embracing magical aesthetics and witchy vibes year round. The whimsical design works for Halloween celebrations, costume events, or simply personal enjoyment. Maintenance remains straightforward with regular topcoat application to preserve design crispness.
10. Mummy Wrapped Nails
Mummy nails bring playful monster energy to your fingertips with entertaining visual effects. Paint a warm beige or tan base representing mummy wrappings. Using white or cream polish and a thin brush, create irregular horizontal lines across each nail to simulate ancient bandages.
Leave strategic gaps between lines for authentic wrapped appearance. On one or two nails, paint tiny googly eyes peeking through the wrappings using black and white polish for personality. The design reads instantly recognizable and brings subtle humor to your Halloween look.
- Nail shape: Short to medium for authentic mummy appearance
- Base color: Warm beige, tan, or cream
- Accent details: White horizontal bandage lines with googly eyes showing through
- Finish: Matte topcoat for aged appearance
- Optional add ons: Brown or gray shading for depth, tiny hieroglyphic details
Mummy nails suit families, trick or treating events, and anyone preferring humorous Halloween aesthetics. The design works well for home application and requires minimal artistic skill compared to more intricate designs. Maintenance involves occasional line touch ups to maintain the bandage effect.
11. Haunted Mansion Gothic Nails
Gothic aesthetics create sophisticated Halloween nails that transition beautifully from seasonal to year round wear. Apply a deep black base to all nails as your foundation. Using metallic gold or silver polish, paint ornate victorian window patterns or architectural details reminiscent of haunted mansions.
Add tiny bats, moons, or baroque flourishes to enhance the gothic atmosphere. The combination of black and metallic accents creates luxurious, elegant contrast. Glossy topcoat ensures the metallic elements shine beautifully and catch light constantly.
- Nail shape: Almond or stiletto for gothic elegance
- Base color: Deep black or charcoal
- Accent details: Gold or silver ornate window designs and decorative flourishes
- Finish: High gloss topcoat
- Optional add ons: Tiny rhinestones, filigree patterns, or small bat silhouettes
Haunted mansion gothic nails work beautifully at evening events, costume parties, and formal Halloween celebrations. The sophisticated design suits professional environments when paired with appropriate outfits. Maintenance involves regular topcoat application to preserve metallic shine and design clarity.
12. Frankenstein Monster Nails
Frankenstein’s monster brings campy nostalgia to Halloween nail art with unmistakable charm. Paint a pale green or mint base representing monster skin coloring. Using black polish and a thin brush, create flat top hairstyles and bold facial features with stark lines and dramatic expressions.
Add tiny bolts on the sides of the nail near the cuticle to complete the iconic monster appearance. The minimalist yet recognizable design works on any nail length or shape. A matte finish enhances the monster’s undead appearance authentically.
- Nail shape: Any shape works beautifully
- Base color: Pale green, mint, or grayish green
- Accent details: Black facial features and flat top hairstyle with tiny bolts
- Finish: Matte topcoat
- Optional add ons: Gray shading for depth, tiny stitches, or scars
Frankenstein monster nails suit those embracing classic monster aesthetics and retro Halloween vibes. The playful design works for parties, trick or treating, and casual seasonal celebrations. Application is straightforward enough for DIY creation, though professionals ensure anatomically accurate monster features.
13. Magical Crystal Ball Nails
Crystal balls represent mystical magic, translating into mesmerizing nail art with dimensional effects. Paint a deep purple or black base to all nails as your foundation. On accent nails, create circular crystal ball designs using iridescent or holographic glitter positioned in the center of each nail.
Surround the crystal ball with tiny stars, moons, or mystical symbols in metallic polish. The glitter creates dimensional depth that appears to swirl within the crystal ball shape. Topcoat sealing ensures the sparkle and mystical effect remains vibrant throughout wear.
- Nail shape: Almond or square for crystal ball visibility
- Base color: Deep purple, black, or midnight blue
- Accent details: Iridescent glitter crystal balls with stars and mystical symbols
- Finish: Glossy topcoat for dimensional effect
- Optional add ons: Gold or silver swirls, tiny rhinestones, or shimmer accents
Crystal ball nails appeal to those embracing witchy, mystical aesthetics both seasonally and year round. The magical design works beautifully at costume parties and Halloween celebrations. Professional application ensures the crystal ball appears centered and perfectly proportioned on each nail.
14. Poisoned Apple Nails
Snow White’s poisoned apple brings dark fairy tale energy to Halloween nail designs. Create a glossy red base representing a shiny, tempting apple. Paint a tiny green leaf and brown stem at the nail tip using a thin brush for realistic apple appearance.
Add a subtle shine or highlight using a lighter shade of red or white to make the apple appear three dimensional and glossy. On accent nails, incorporate tiny drops of black poison dripping from the apple for dark storytelling. The design balances beauty with sinister undertones perfectly.
- Nail shape: Round or oval for apple shape authenticity
- Base color: Glossy, vibrant red
- Accent details: Green leaf, brown stem, and optional black poison drips
- Finish: High gloss topcoat
- Optional add ons: Gold accents, tiny sparkles, or black shading
Poisoned apple nails suit dark fairy tale aesthetic preferences and anyone embracing villainous Halloween vibes. The design works beautifully for costume events paired with Evil Queen or dark princess outfits. Maintenance involves regular topcoat application to preserve the glossy, tempting apple appearance.
15. Eerie Eye Design Nails
Realistic eyes create eerie, unsettling nail art that captures attention instantly. Paint a neutral beige or nude base to all nails as your canvas. Using thin brushes and detailed techniques, paint realistic human eyes with colored irises, white sclera, and dark pupils.
Add delicate eyelashes, subtle eyebrow details, and fine veining in the whites of the eyes for maximum realism. Vary iris colors across nails for visual interest and diversity. The unsettling effect of multiple staring eyes creates perfectly spooky Halloween energy.
- Nail shape: Almond, square, or oval for eye visibility
- Base color: Neutral beige, nude, or pale cream
- Accent details: Realistic eyes with varied iris colors, lashes, and eyebrow details
- Finish: Glossy topcoat for eye shine
- Optional add ons: Tiny tears, blood vessels, or subtle bruising around eyes
Eerie eye nails create bold statements at Halloween parties and costume events. The design requires significant artistic skill, making professional application highly recommended. The realistic detail provides conversation starting points and genuinely unsettling visual impact throughout your celebrations.
Frequently Asked Questions
How long do Halloween nail designs typically last?
Most polish based nail designs last between two to three weeks with proper topcoat application and careful handling. Gel polish designs extend longevity significantly, often lasting four to six weeks before chipping or lifting occurs. The durability depends on your daily activities, water exposure, and how well you maintain the topcoat through regular application.
Designs with detailed artwork or embellishments may require earlier touch ups to maintain visual clarity and polish integrity. Regular topcoat reapplication every three to four days extends the overall appearance and protection of your design.
Can I create Halloween nail designs at home, or should I visit a professional?
Both options work beautifully, depending on your artistic skill level and design complexity. Simple designs like candy corn stripes or basic ghost faces transfer easily to home application with patience and proper tools. More intricate designs like realistic eyes or detailed spider webs benefit significantly from professional execution, which ensures precision and longevity.
Professional nail artists possess advanced techniques, premium materials, and steady hands that produce flawless results. If you choose home application, invest in quality nail polish, thin art brushes, dotting tools, and painter’s tape to achieve salon quality results within your comfort level.
Which nail shapes work best for Halloween designs?
All nail shapes accommodate Halloween designs beautifully, though some shapes enhance specific designs better than others. Almond and coffin shapes provide generous space for detailed artwork and dimensional designs. Square and round shapes work wonderfully for simpler designs and everyday wearability.
Stiletto nails create dramatic impact for bold designs but may feel uncomfortable during daily activities. Short nails work perfectly for designs like candy corn or minimalist ghost faces. Choose shapes based on personal comfort, lifestyle demands, and the specific design you envision.
How do I prevent Halloween nail polish from staining my skin and cuticles?
Apply a thin barrier of cuticle oil or hand cream around your nail perimeter before painting to create a protective shield. This prevents polish from adhering to skin and allows easy cleanup after painting. Alternatively, use painter’s tape around your nails as a stencil to maintain clean application boundaries.
After polish application, allow adequate drying time before touching your skin. A cotton swab dipped in acetone or polish remover cleans any stray polish quickly and efficiently. Keeping your nails properly filed and shaped also reduces polish application to surrounding skin areas.
What is the best way to remove Halloween nail designs without damaging my natural nails?
Soak your nails in warm water mixed with gentle dish soap for five to ten minutes to soften the polish. Use a metal cuticle pusher or wooden stick to gently lift dried polish edges, then soak again to further soften remaining polish. Apply acetone or quality nail polish remover on a cotton pad, press against your nail, and hold for thirty seconds before gently wiping away softened polish.
Avoid aggressive scrubbing or peeling, which damages the nail surface and causes weakness. For gel polish designs, seek professional removal or use proper gel removal techniques with acetone soaking. Always moisturize your nails and cuticles thoroughly after removal to restore hydration and strength.
Should I use gel polish or traditional polish for Halloween nail designs?
Gel polish offers superior longevity, lasting four to six weeks compared to two to three weeks for traditional polish. The glossy finish remains consistently vibrant without chipping, and designs maintain sharp detail throughout wear. However, gel polish requires UV or LED curing and professional removal, adding time and cost to your nail care routine.
Traditional polish allows quick application, immediate wear, and effortless removal at home using simple acetone soaking. Traditional polish works beautifully for temporary seasonal designs or those you want to change frequently throughout Halloween month. Choose based on your lifestyle, commitment level, and budget preferences.
Can I combine multiple Halloween design elements on one nail set?
Absolutely! Mixing design elements creates visually interesting, personalized nail art that tells a cohesive story. For example, combine spider webs with tiny pumpkins, or layer ghost silhouettes over mummy wrappings. The key involves choosing complementary colors and ensuring elements do not overwhelm the nail surface with excessive detail.
Create visual balance by featuring one dominant design on most nails and using one to two accent nails for secondary elements. This approach maintains design coherence while allowing creative expression and personalization. Professional artists excel at integrating multiple elements seamlessly, though confident DIY enthusiasts can experiment safely with practice.
Final Thoughts
Halloween nail designs offer incredible opportunities for creative expression and seasonal celebration. From minimalist elegance to dramatic artistry, these fifteen designs accommodate every aesthetic preference and skill level. Whether you choose bold blood drips, playful mummies, or sophisticated haunted mansions, your nails become tiny canvases for Halloween storytelling.
Embrace the freedom to experiment, mix designs, and create something entirely unique that reflects your personal style. Visit nail expert tips for additional inspiration and detailed tutorials. Your Halloween nails deserve just as much creativity and celebration as the rest of your seasonal festivities.