
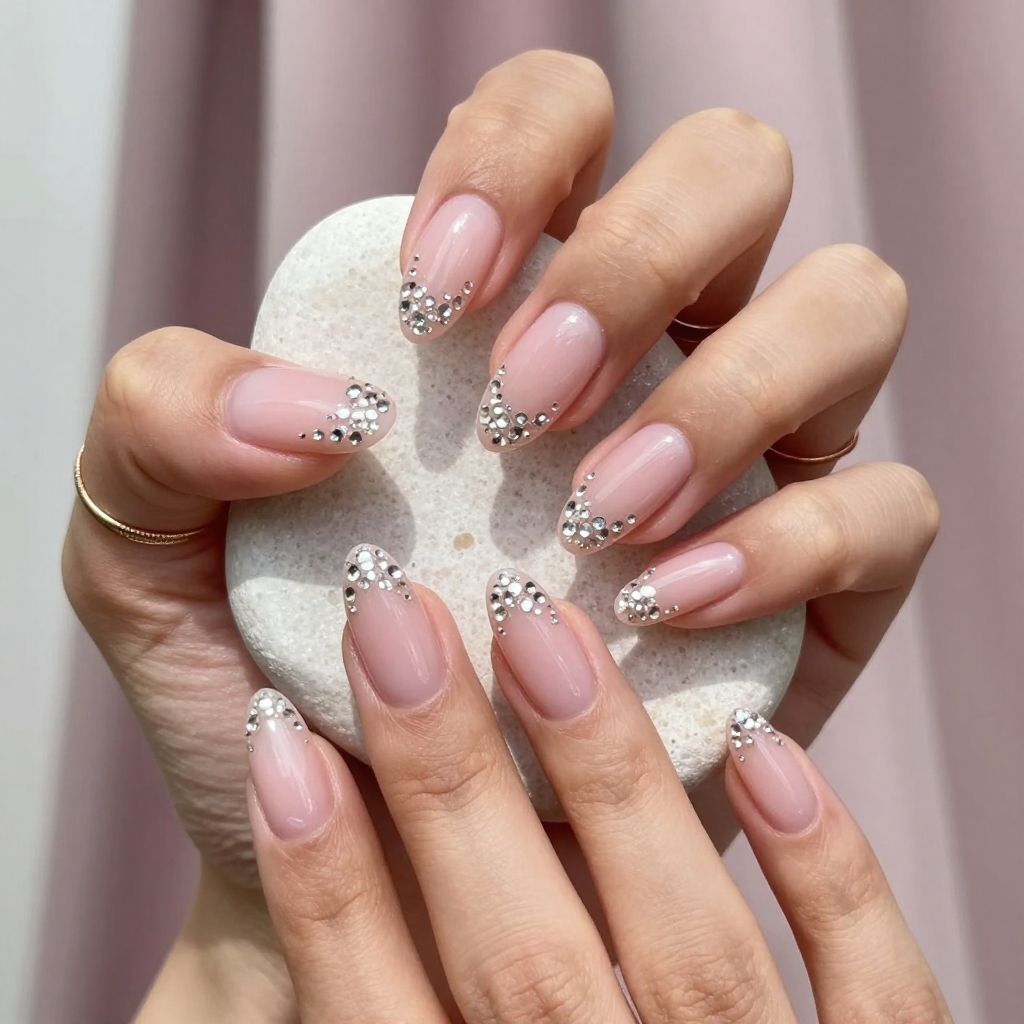
Rhinestone nail designs represent the perfect intersection of elegance and glamour, transforming your fingertips into miniature works of art that catch light and attention effortlessly. Whether you’re preparing for a special occasion or simply craving everyday sparkle, these designs offer infinite possibilities for self expression and creativity. The beauty of rhinestone nails lies in their versatility; they work equally well on minimalist bases as do ornate, maximalist styles.
From delicate scattered crystals to bold statement clusters, rhinestone applications elevate even the simplest nail art into something truly extraordinary. Keep scrolling to discover fifteen inspiring rhinestone nail designs that will have you booking your next salon appointment or gathering supplies for a DIY manicure adventure.
Rhinestone Nail Designs
1. Classic French Tips with Scattered Rhinestones
The timeless French manicure receives a luxurious upgrade when you introduce delicate rhinestones scattered across the white tips and lower third of the nail. This design maintains the sophisticated simplicity of the classic French look while adding unexpected sparkle that catches light from every angle. The contrast between the clean, creamy base and the glittering accents creates a refined aesthetic that works beautifully for both casual and formal settings.
Apply a soft pink or nude base coat to the nail bed, then carefully paint crisp white tips using a thin nail art brush or tape for precision. Once the white is fully dry, use a rhinestone picker tool to place individual crystals in a loose, organic pattern across the tips and scattered down the sides of the nail. The randomness of placement makes this design feel intentional and artistic rather than overly controlled.
- Nail shape: Coffin or oval
- Base color: Soft pink or nude
- Accent details: White tips with scattered clear or AB rhinestones
- Finish: Glossy top coat
- Optional add ons: Gold leaf accents between rhinestones
This design works wonderfully for bridal events, sophisticated date nights, and professional settings where you want to add a subtle touch of glamour without appearing overly dramatic. The delicate placement ensures the design remains wearable for daily activities, and the closed top coat protects the rhinestones from snagging on fabric or hair. Maintenance is straightforward; simply avoid harsh chemicals and use a gentle touch when washing your hands.
2. Full Coverage Rainbow Rhinestone Statement Nails
Make a bold artistic statement by covering your entire nail surface with densely packed rainbow rhinestones in varying sizes, creating a kaleidoscopic effect that celebrates color and light. This design demands confidence and presence, transforming your nails into eye catching accessories that spark conversation wherever you go. The combination of multiple colored crystals creates depth and dimension that photographs beautifully and appears more expensive than the cost of materials suggests.
Begin with a clear or slightly tinted base coat that allows the nail surface to show through beneath the rhinestones. Working in sections, apply a generous layer of sticky gel or rhinestone glue, then use tweezers or a rhinestone picker to carefully place crystals of varying sizes in a deliberate pattern. Mix crystal colors strategically, alternating between warm and cool tones to create visual balance and prevent the design from appearing chaotic.
- Nail shape: Square or oval for maximum surface area
- Base color: Clear or nude
- Accent details: Multi colored rhinestones in various sizes covering entire nail
- Finish: Glossy gel topcoat sealed with UV lamp
- Optional add ons: Chrome powder accents between crystals
This striking design suits special events, parties, music festivals, and anyone seeking maximum impact and visual interest. The density of rhinestones means this design requires professional application or significant patience and skill for home application. Plan for regular touch ups every two to three weeks, as the glue gradually weakens with water exposure and daily wear.
3. Ombré Gradient with Strategic Rhinestone Placement
Combine the softness of an ombré gradient with strategic rhinestone placement concentrated at the nail tips to create a design that feels both dreamy and dazzling. This approach allows the gradient to remain the focal point while rhinestones add sparkle without overwhelming the color transition. The result is a nail design that appears sophisticated and requires genuine artistry to execute.
Create your ombré using sponging or gradient gel techniques, blending your chosen colors smoothly from the nail base to the tip. Once the gradient is sealed with a glossy top coat, apply rhinestones primarily along the tip and side edges, creating a frame that directs the eye naturally. The sparse rhinestone placement lets the beautiful color work shine while adding glamorous punctuation.
- Nail shape: Almond or stiletto
- Base color: Ombré gradient from light to dark shade
- Accent details: Clear or matching colored rhinestones at tips and edges
- Finish: Glossy sealed topcoat
- Optional add ons: Opal rhinestones for enhanced color shifting effect
This design works particularly well for weddings, formal dinners, and professional settings where you want sophistication with a touch of glamour. The balanced rhinestone placement ensures the design remains practical for typing, driving, and everyday tasks without snagging. Refresh this design monthly, as the gradient lines remain visible and beautiful even as individual rhinestones may loosen.
4. Reverse Glitter Nail with Rhinestone Border
Apply glitter polish to the inside of a clear acrylic or gel base, then frame the nail edge with a precise rhinestone border for a design that appears magical from both angles. This technique, known as reverse glitter, creates depth and keeps sparkle protected beneath the clear surface, reducing maintenance concerns. The rhinestone border acts as a sophisticated frame that elevates the entire design.
Start with a clear gel or acrylic base that you will eventually apply glitter to the reverse side of before sealing. Alternatively, use pre made clear nails with glitter already embedded, then carefully apply a thin line of rhinestone glue around the nail perimeter. Place small, uniform rhinestones in a single line or slightly overlapping pattern to create a defined border.
- Nail shape: Round or square
- Base color: Clear with reverse glitter interior
- Accent details: Rhinestone border framing the nail edge
- Finish: Sealed with protective topcoat
- Optional add ons: Gold or silver nail art striping tape along the border
This innovative design suits anyone seeking durability combined with elegant sparkle, as the glitter sits protected beneath the surface. The enclosed design is perfect for active lifestyles, water sports, and anyone concerned about rhinestone longevity. This design easily lasts three to four weeks without significant maintenance or touch ups.
5. Minimalist Single Accent Rhinestone on Neutral Base
Sometimes less truly is more, and this design proves that philosophy by featuring a single large statement rhinestone centered on a neutral toned base nail. This approach suits those who appreciate understated elegance and prefer quality over quantity in their nail art. The solitary crystal becomes a focal point that draws attention through contrast and deliberate placement rather than visual noise.
Paint your chosen neutral shade as the base, allowing two coats for even coverage and depth of color. Once completely dry, apply a small drop of rhinestone glue precisely where you want your crystal to sit, then carefully place one large, high quality rhinestone using a picker tool. Seal the entire nail with a clear topcoat, ensuring the rhinestone sits securely.
- Nail shape: Oval or square
- Base color: Taupe, beige, or soft gray
- Accent details: Single large clear or matching colored rhinestone
- Finish: Glossy sealed topcoat
- Optional add ons: Matte base coat for contrast
This refined design transitions seamlessly from office to evening occasions, proving that elegance does not require complexity. The single rhinestone placement means minimal maintenance, and the design appears intentional and fashionable rather than incomplete. This style particularly suits professional environments where subtle sophistication is preferred over bold statements.
6. Half Moon Rhinestone Design with Metallic Base
Create visual interest by painting the lower half of each nail with metallic polish and densely filling that section with rhinestones while keeping the upper nail clean and simple. This geometric approach offers the best of both worlds: the elegance of a clean design paired with the glamour of full rhinestone coverage in a specific zone. The half moon shape naturally draws the eye and creates a sophisticated visual break.
Apply your chosen metallic base color to the lower half of the nail using a curved brush or stripe tape for precision. Once dry, fill this metallic section completely with small to medium rhinestones, working carefully to maintain the defined half moon shape. Seal everything with a generous topcoat that fills gaps between crystals and creates a smooth, finished appearance.
- Nail shape: Coffin or almond
- Base color: Rose gold or champagne metallic lower half; clear upper half
- Accent details: Densely packed rhinestones filling the metallic half moon section
- Finish: Glossy sealed topcoat
- Optional add ons: Geometric nail art striping to define the half moon border
This design offers elegance with wearability, as the clean upper half keeps typing and daily activities comfortable while the decorated lower half provides visual drama. The geometric precision makes this design feel contemporary and intentional rather than random. Plan for professional application or significant patience, as the clean edge requires precision and steady hands.
7. Encapsulated Confetti Rhinestone Design
Layer holographic confetti and tiny rhinestones between two layers of clear gel to create a design that feels bouncy, youthful, and endlessly dimensional. This encapsulation technique protects all sparkly elements while allowing them to shift and catch light from different angles. The suspended particles create depth that flat applications cannot achieve.
Apply a clear gel base layer and cure it under a UV lamp. Sprinkle your chosen confetti and small rhinestones across the cured surface, then cap with another layer of clear gel that encapsulates everything before final curing. The trapped elements remain protected and durable throughout the entire wear period.
- Nail shape: Round or square
- Base color: Clear with encapsulated confetti and rhinestones
- Accent details: Holographic confetti mixed with varying sized rhinestones
- Finish: High shine glossy topcoat
- Optional add ons: Iridescent glitter flakes for enhanced sparkle
This playful design suits festive occasions, vacation nail appointments, and anyone who adores maximalist sparkle without the maintenance concerns of exposed rhinestones. The encapsulation provides superior durability compared to traditional rhinestone applications, making this excellent for active lifestyles. This design typically lasts the full three to four week grow out cycle without dulling or loosening.
8. Matte Black with Diamond Pattern Rhinestones
Pair sophisticated matte black polish with clear rhinestones arranged in a geometric diamond or lattice pattern to create a design that feels modern, edgy, and surprisingly wearable. The matte finish provides a luxurious canvas that makes crystals appear even more brilliant through contrast. This design celebrates geometry and precision while feeling current and fashion forward.
Apply matte black gel or regular polish to your entire nail and cure if using gel. Using a rhinestone picker tool and adhesive, carefully place crystals in a planned diamond or lattice grid pattern, maintaining even spacing and alignment. The geometric precision elevates this from simple sparkle to intentional, design focused nail art.
- Nail shape: Stiletto or coffin
- Base color: Matte black gel or polish
- Accent details: Clear rhinestones in geometric diamond pattern
- Finish: Matte sealed topcoat or glossy topcoat over rhinestones only
- Optional add ons: Gold geometric nail striping tape for enhanced pattern definition
This bold design suits anyone confident in making a statement while maintaining professional wearability for many work environments. The geometric pattern requires planning and precision but appears effortless once complete. Maintenance is minimal, as the matte finish hides dust and oils that accumulate on nails.
9. Soft Pink with Gradient Rhinestone Fade
Create an ombré effect using rhinestones alone, starting with dense crystal placement at the nail tip and gradually spacing them further apart toward the cuticle. This technique requires no nail art skills beyond rhinestone application, making it accessible to DIY enthusiasts seeking professional looking results. The gradient effect appears sophisticated and requires significantly fewer rhinestones than full coverage designs.
Paint a soft pink base across all nails and allow it to dry completely. Beginning at the tip, apply rhinestones closely together in a concentrated band, then gradually increase spacing as you work toward the cuticle, creating a fade effect that appears intentional and artistic. The sparse placement toward the base keeps the design comfortable for daily wear while maintaining sparkle at the tips.
- Nail shape: Almond or oval
- Base color: Soft pink or baby pink gel or polish
- Accent details: Clear rhinestones with gradient fade from tip to cuticle
- Finish: Glossy sealed topcoat
- Optional add ons: AB rhinestones for enhanced color shifting
This elegant design transitions beautifully from casual to formal occasions, offering versatility that simple designs cannot match. The gradient fade requires planning but is achievable even for nail art beginners. Maintenance is straightforward, with minimal touch ups needed over three to four weeks.
10. Nude Base with Rhinestone French Tips Extended
Elevate traditional French tips by creating a thick, extended tip section completely filled with rhinestones in graduating sizes, blending seamlessly from the nude base into the sparkly tip. This design feels romantic and feminine while maintaining the sophistication associated with French manicures. The extended, rhinestone filled tip creates drama without appearing costume like.
Apply a nude base to the entire nail and allow drying. Paint or carve out a thicker French tip line than traditional designs, extending it higher up the nail. Fill this extended tip section with rhinestones, using larger crystals at the edge and gradually smaller stones toward the base of the tip section for a blended appearance.
- Nail shape: Coffin or oval
- Base color: Nude or beige
- Accent details: Rhinestones in varying sizes filling extended French tip
- Finish: Glossy sealed topcoat
- Optional add ons: Holographic or opal rhinestones for enhanced sparkle
This romantic design suits bridal applications, special events, and anyone seeking sparkle with refined elegance. The extended French tip provides drama while the rhinestones maintain the design’s sophistication. Regular maintenance every three weeks keeps this design looking fresh and flawless.
11. Sheer White with Side Rhinestone Stripe
Apply a sheer white gel that creates a barely there nude effect, then add a vertical stripe of closely spaced rhinestones running along the side or center of each nail for an architectural element that feels modern and chic. This linear approach to rhinestone placement feels intentional and geometric, suiting contemporary nail art aesthetics. The sheer base remains minimal while the rhinestone stripe creates significant visual impact.
Paint a sheer white or jelly colored base and cure it completely. Using a thin line of rhinestone adhesive, carefully apply rhinestones in a straight vertical line down one side of the nail or along the center. Maintaining even spacing and alignment creates a polished, professional appearance that suggests intentional design.
- Nail shape: Square or rectangular
- Base color: Sheer white or jelly nude
- Accent details: Rhinestones in vertical stripe formation
- Finish: Glossy sealed topcoat
- Optional add ons: Gold or silver striping tape for enhanced linear definition
This contemporary design suits minimalists who appreciate sparkle without visual chaos, making it perfect for modern professionals and creative individuals alike. The linear rhinestone placement is easier to execute than scattered applications, making this accessible to DIY enthusiasts. The design remains comfortable for typing and daily activities while providing noticeable glamour.
12. Deep Berry with Corner Rhinestone Accents
Choose a rich, deep burgundy or plum base and concentrate rhinestones in the inner corner of the nail bed and along the side walls, creating a frame that draws attention without covering the entire nail. This strategic placement celebrates the nail shape itself while adding glamorous accents. The deep color provides beautiful contrast to clear and AB rhinestones.
Paint your chosen deep berry shade across all nails, using two coats for rich color saturation. Once completely dry, apply rhinestones to the inner corners and along the side nail beds, creating a decorative frame that highlights the nail’s natural shape. This corner and side placement feels architectural and intentional.
- Nail shape: Coffin or almond
- Base color: Deep burgundy or plum
- Accent details: Rhinestones concentrated in corners and along side edges
- Finish: Glossy sealed topcoat
- Optional add ons: Crystal AB rhinestones for enhanced sparkle against dark base
This sophisticated design suits evening events, parties, and anyone seeking understated glamour that remains office appropriate. The deep color and strategic rhinestone placement feel expensive and intentional. Maintenance is straightforward, with the deep color hiding dust and oils effectively.
13. Rose Gold Chrome with Fine Rhinestone Detail
Layer rose gold chrome powder over a base coat, then add delicate rhinestones in carefully spaced patterns that complement rather than compete with the mirrored finish. Chrome nails already possess significant visual impact, so rhinestones should enhance rather than overwhelm. This combination creates a design that appears futuristic yet elegant.
Apply your base coat and cure completely. Buff the surface lightly to create texture that helps chrome powder adhere properly. Apply the rose gold chrome powder using the manufacturer’s instructions, then add selective rhinestones in a delicate pattern. The mirror like chrome provides sufficient sparkle on its own, so use rhinestones as accents rather than coverage.
- Nail shape: Oval or square
- Base color: Rose gold chrome mirror effect
- Accent details: Selective rhinestones in delicate patterns
- Finish: Matte or glossy topcoat depending on preference
- Optional add ons: Opal rhinestones to echo the iridescent chrome effect
This futuristic design suits anyone seeking contemporary, high impact nails that feel different from traditional nail art. The combined chrome and rhinestone elements create a design that photographs beautifully and appears expensive. Plan for professional application, as chrome powder application requires specific products and technique.
14. Nude with Negative Space and Rhinestone Outline
Use negative space by leaving portions of the natural nail visible, then outline those negative spaces with carefully placed rhinestones that define geometric shapes and create visual interest without solid coverage. This design philosophy appeals to minimalists who appreciate sparkle without visual heaviness. The rhinestones function as an outline rather than a fill, reducing material needs and application time.
Paint a nude base and allow complete drying. Identify geometric shapes you want to highlight using negative space, then carefully outline those shapes with rhinestones, leaving the center of each space empty to reveal the base color beneath. The outlined shapes create definition and sophistication through strategic placement rather than coverage.
- Nail shape: Almond or coffin
- Base color: Nude or pale pink
- Accent details: Rhinestone outlines creating geometric shapes with negative space
- Finish: Glossy sealed topcoat
- Optional add ons: Holographic rhinestones for color shifting within outlines
This design-forward aesthetic suits creatives, minimalists, and anyone seeking nail art that feels intentional and contemporary. The outlined approach requires planning and precision but appears modern and sophisticated. Maintenance is minimal, as the sparse rhinestone placement means fewer crystals to potentially loosen.
15. Multi Color Glitter Mix with Scattered Rhinestones
Combine multiple glitter colors and sizes in a single base layer, then scatter rhinestones across the sparkly surface to add dimension and elevated glamour. This maximalist approach celebrates color, texture, and shine without requiring precise application or geometric planning. The result feels festive, fun, and absolutely dazzling from every angle.
Paint your base color, then apply multiple glitter shades in a loose, overlapping pattern that creates color harmony. Once the glitter base is sealed, scatter rhinestones across the surface in a random pattern, creating peaks of crystal that catch light against the glitter background. The combination creates texture and depth that simple applications cannot achieve.
- Nail shape: Round or oval
- Base color: White, nude, or clear base with multi color glitter
- Accent details: Assorted rhinestones scattered across glitter base
- Finish: High shine glossy topcoat
- Optional add ons: Holographic confetti mixed into glitter for enhanced sparkle
This celebratory design suits parties, festivals, vacation appointments, and anyone who adores maximum glamour and sparkle. The busy base means this design works best for special occasions rather than everyday wear. The combined materials create sufficient visual interest that the design appears intentional despite its seemingly random application.
Frequently Asked Questions
How Long Do Rhinestone Nails Typically Last?
High quality rhinestones applied with professional grade adhesive and sealed with proper topcoat typically last three to four weeks, matching the natural growth cycle of gel manicures. The longevity depends significantly on application quality, daily habits, and maintenance diligence. If you regularly expose your nails to harsh chemicals, excessive water, or rough activities, expect individual rhinestones to loosen earlier than the standard timeframe.
Protect your rhinestone investment by wearing gloves during household chores and avoiding extended contact with harsh chemicals or hot water. Gently pat your hands dry rather than rubbing aggressively, and avoid using your nails as tools. These simple precautions significantly extend the life of your rhinestone design.
Can You Apply Rhinestones at Home, or Do You Need Professional Application?
Many rhinestone designs are absolutely achievable at home with the right tools and patience, though professional application generally yields superior results due to experience and precision. Simple designs like scattered rhinestones, corner accents, or geometric lines work well for beginners, while dense coverage or intricate patterns benefit from professional hands. The difference often comes down to your patience level and desired precision rather than actual difficulty.
Invest in quality tools if you choose home application: a proper rhinestone picker, high quality rhinestone adhesive, and quality crystals make a significant difference in the final appearance and longevity. Watch detailed tutorials before beginning, practice on practice nails first, and work slowly rather than rushing. Many people find the meditative aspect of home rhinestone application genuinely enjoyable.
What Type of Rhinestones Provide the Best Sparkle and Durability?
Crystal AB (aurora borealis) rhinestones offer the most brilliant sparkle and color shifting effects, though they cost slightly more than standard clear crystals. These multi faceted stones create rainbow reflections that appear more expensive and eye catching than single color alternatives. For the most durable option, choose Czech or Japanese made crystals rather than generic alternatives, as they maintain their sparkle and resist dulling more effectively.
Consider your base color when selecting rhinestone type: clear and AB work beautifully on any base, while colored rhinestones should coordinate with your chosen polish shade. Opal rhinestones offer a softer sparkle with subtle color shifting, perfect for delicate, romantic designs. Never compromise on rhinestone quality, as inferior crystals dull quickly and feel cheap even when applied perfectly.
How Do You Remove Rhinestone Nails Without Damaging Your Natural Nails?
Soak your nails in warm water with nail oil or cuticle oil for ten to fifteen minutes to soften the adhesive, then gently attempt to peel rhinestones away using a wooden or plastic stick. Never pick aggressively with metal tools, as this damages the nail surface and causes peeling. If rhinestones resist coming off, soak longer rather than applying force. Professional removal is always an option if you are uncertain about the process.
After removing all rhinestones, gently file and buff your nails to remove any remaining adhesive residue, then deeply moisturize with cuticle oil or hand cream. Allow your nails to rest for at least one week before applying new polish or designs, giving them time to recover from the weight and stress of rhinestone wear.
Do Rhinestone Nails Work for Everyday Wear, or Are They Only for Special Events?
Rhinestone designs absolutely work for everyday wear depending on placement, density, and your personal lifestyle. Minimalist designs with just a few strategically placed crystals, geometric lines, or corner accents integrate seamlessly into daily activities and professional environments. Busy designs with dense coverage work best for special occasions, as the increased visual weight and maintenance demands suit temporary rather than permanent wear.
Consider your lifestyle when choosing your design: active individuals benefit from sparse, geometric rhinestone placement, while those in creative fields can embrace bolder, maximalist applications. The key is balancing your desire for sparkle with the practical demands of your daily activities. Many people keep minimalist rhinestone designs on their nails permanently, switching to more dramatic applications for specific events.
How Do You Maintain Rhinestone Nails to Keep Them Looking Fresh?
Maintain rhinestone nails by keeping your hands moisturized, which keeps the surrounding skin and cuticles healthy and makes your nails appear more polished. Avoid exposing nails to excessive heat, cold, or harsh chemicals, and wear gloves during any cleaning activities. Check weekly for loose rhinestones and address them immediately with a tiny drop of adhesive, preventing further loosening and maintaining your design’s cohesion.
Keep a small rhinestone repair kit on hand for quick touch ups: a bottle of quality rhinestone adhesive, a few extra crystals in matching colors, and a rhinestone picker or wooden stick for precise application. These minor maintenance efforts significantly extend the lifespan of your design and keep nails looking intentional rather than worn or damaged.
Are There Rhinestone Options That Are Hypoallergenic for Sensitive Skin?
Most quality rhinestones made from crystal glass or genuine gemstones are hypoallergenic and safe even for sensitive skin, as they sit on top of the nail rather than making contact with the skin. The potential allergen is typically the adhesive rather than the rhinestones themselves. If you have adhesive sensitivities, discuss hypoallergenic adhesive options with your nail technician before your appointment.
Ensure your technician uses a rhinestone adhesive specifically formulated for nail applications rather than general craft glue, which may contain irritating chemicals. Properly sealed rhinestones sit completely protected under topcoat, eliminating any direct skin contact. If you experience irritation around your nails, this likely stems from the application process or adhesive rather than the rhinestones themselves, and your technician can address it in future appointments.
Final Thoughts
Rhinestone nail designs represent an accessible way to add luxury, glamour, and personal style to your everyday appearance or special occasion look. From minimalist single crystal accents to maximalist full coverage applications, rhinestone options exist for every aesthetic preference, skill level, and lifestyle. The incredible variety means you can express your personality while enjoying the transformative power of sparkle and shine.
Whether you choose professional application or embrace DIY creation, rhinestone nails reward patience, quality materials, and intentional design choices. Experiment with different densities, placements, and color combinations to discover the rhinestone aesthetic that speaks to your personal style. Your nails deserve sparkle, and rhinestone designs deliver that magic beautifully.
Ready to explore more nail art inspiration and design techniques? Discover endless possibilities by checking out our comprehensive collection of nail art designs that showcase creativity in every form. For those seeking simpler, more accessible aesthetics, our guide to cute nail designs offers charming alternatives that feel fresh and approachable.